designed for the way women work.

Seed Starting Tips #1 and #2
Category: Presenting "The Curious Gardener", Spring Projects, Tools & Techniques
Tip #1: Preparing your soil. Before you put your potting mix in the container where you will be germinating seeds, put the mix in a large bowl and add hot water. Work the soil in your hands until it’s all mixed. Add more hot water if necessary to keep it moist but not too moist! See video. This is the consistency you want. Whenever I’ve had difficulty with germination or with fungus growing on seeds it’s because there was too much moisture in the potting mix. You can control this better if you add the seeds to already-moistened potting mix.
After getting the moisture level the way you want it, fill your container or individual cells in a larger tray with the soil mix and press it down so it’s firm but not hard. Drop your seeds on top of the soil, tamp the seeds down lightly on the moistened potting mix and then screen dry soil on top of the seeds and cover them with as much soil as the seeds are thick. Put a plastic cover over your container to create a greenhouse effect. Put in a darkish, warm area. I put mine on top of our refrigerator. There is no need to add more water until after germination.
Level of moisture and temperature are the most critical considerations for germination.
Seed Starting Tip #2: What to do when your seeds germinate! Light is the most important consideration after germination. Keep a close watch on your seed trays and when the seeds germinate take the lids off and give them a little light and air — but not harsh, direct sunlight. You don’t want to let the delicate roots dry out or they will die.
Put your seedlings under grow lights or next to a window, in a cooler setting than the warm location where they germinated. It makes them stronger if the temperature is cool, but not cooler than 48F or so.
The reason I like grow lights is that they give more light than the sun can provide — 16 hours a day is ideal. Also grow lights offer a cool, even light so they won’t dry out your seedlings. Get the lights as close as you can to the plants so they don’t stretch too far to reach it. For more information about growing with lights, click here.
Give your seedlings a light feeding of a general fertilizer. Water lightly as needed to prevent roots from drying out.
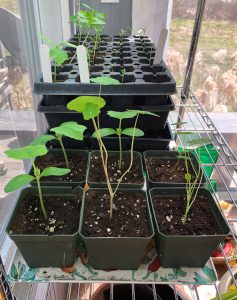
I usually prick seedlings out into plug trays shortly after germination. This gives each viable seedling its own cell. To do this I take a spoon and gently remove the tiny seedling from the original germination tray and move it to its own living space in a larger tray.
Step by Step:
- Putting moistened soil in germinating tray. See video here.
- Putting seedlings into a larger tray with individual compartments. See video here.

What a great idea Dorian!
Easy to do for next time I’m starting seeds. Thanks!
For tip #1 in starting seeds, what does it mean to screen dry? I’d like to try this tip. Looking forward to tip 2
I don’t have grow light, but wantto start seeds during this time of self-imposed isolation. Any suggestions? I have everything else. Thankx
What can I do if I don’t have any grow lights?
Follow our tips and you should be all set. Buy some potting soil and use containers you have around the house.
You don’t need grow lights. Most people put their seedlings (after they germinate) in a bright window. Don’t let them get scorched by the sun.
What can I use if I don’t have grow trays?
Please start selling seeds
@Lorraine , who wrote “For tip #1 in starting seeds, what does it mean to screen dry? I’d like to try this tip. Looking forward to tip 2” – In this case it means to shake dry soil through a screen or sieve to to gently cover your seeds with a thin topping of soil. Good luck!
Please send wholesale catalog to me at Edible Petals
PO Box 360
Orient, New York